Dec 9, 2009

Microsoft Certified IT Professional (MCITP)

Demonstrate your range of expertise, real-world skills, and mastery of Microsoft technologies by earning a Microsoft Certified IT Professional (MCITP) credential.

Level:

Two or more years of experience as an IT professional

Audience:

IT professional

Type:

Microsoft Certification


Certifications

By earning an MCITP credential, you distinguish yourself as an IT professional with the skills and proven job-role capabilities to effectively work with Microsoft technologies.

Certification

Required exam(s)*

Windows Client

MCITP: Enterprise Desktop Administrator 7

Exam 70-680

Exam 70-686 (available late 2009)

MCITP: Consumer Support Technician

Exam 70-620

Exam 70-623

MCITP: Enterprise Support Technician

Exam 70-620

Exam 70-622

Windows Server

MCITP: Enterprise Administrator

Exam 70-640

Exam 70-642

Exam 70-643

plus either

Exam 70-620

or

Exam 70-624

or

Exam 70-680

and

Exam 70-647

MCITP: Server Administrator

Exam 70-640

Exam 70-642

Exam 70-646

Microsoft SQL Server

MCITP: Database Administrator 2008

Exam 70-432

Exam 70-450

MCITP: Database Developer 2008

Exam 70-433

Exam 70-451

MCITP: Business Intelligence Developer 2008

Exam 70-448

Exam 70-452

MCITP: Database Administrator

Exam 70-431

Exam 70-443

Exam 70-444

MCITP: Database Developer

Exam 70-431

Exam 70-441

Exam 70-442

MCITP: Business Intelligence Developer

Exam 70-445

Exam 70-446

Microsoft Office Project Server

MCITP: Enterprise Project Management with Microsoft Office Project Server 2007

Exam 70-632

Exam 70-633

Exam 70-634

Microsoft Exchange Server

MCITP: Enterprise Messaging Administrator

Exam 70-236

Exam 70-237

Exam 70-238

Microsoft Certified Technology Specialist (MCTS)

Demonstrate your specialized technical expertise with a Microsoft Certified Technology Specialist (MCTS) credential. By earning this credential, you can prove your ability to successfully implement, build on, troubleshoot, and debug a particular Microsoft technology, such as a Windows operating system, Microsoft Exchange Server, Microsoft SQL Server, and Microsoft Visual Studio.

Level:

One or more years of experience implementing, troubleshooting, and debugging a specific technology

Audience:

IT professional

Type:

Microsoft Certification


Certification

Exam number*

Windows technologies


MCTS: Business Desktop Deployment

MCTS: Connected Home Integrator

MCTS: Windows Embedded CE 6.0: Application Development

MCTS: Microsoft Windows Embedded Standard 2009, Development

MCTS: Windows Essential Business Server 2008, Configuration

MCTS: Windows Mobile 5.0, Applications

MCTS: Windows Mobile 5.0, Implementing and Managing

MCTS: Windows Server 2003 Hosted Environments - Configuration and Management

MCTS: Windows Server 2008 Active Directory Configuration

MCTS: Windows Server 2008 Network Infrastructure Configuration

MCTS: Windows Server 2008 Applications Infrastructure Configuration

MCTS: Windows Server Virtualization, Configuration

MCTS: Windows Small Business Server 2008, Configuration

MCTS: Windows Vista – Configuration

MCTS: Windows 7 – Configuration

Microsoft Visual Studio and Microsoft .NET Framework technologies


MCTS: .NET Framework 2.0 Web Applications

MCTS: .NET Framework 2.0 Windows Applications

MCTS: .NET Framework 2.0 Distributed Applications

MCTS: .NET Framework 3.5 ADO .NET Applications

MCTS: .NET Framework 3.5 ASP .NET Applications

MCTS: .NET Framework 3.5 Windows Communication Foundation Applications

MCTS: .NET Framework 3.5 Windows Forms Applications

MCTS: .NET Framework 3.5 Windows Presentation Foundation Applications

MCTS: .NET Framework 3.5, Windows Workflow Foundation Applications

Microsoft SQL Server technologies


MCTS: Microsoft SQL Server 2005

MCTS: Microsoft SQL Server 2005 Business Intelligence

MCTS: SQL Server 2008, Business Intelligence Development and Maintenance

MCTS: SQL Server 2008, Database Development

MCTS: SQL Server 2008, Implementation and Maintenance

Microsoft Office System technologies (including Office SharePoint Server and Office Project Server)


MCTS: Enterprise Project Management with Microsoft Office Project Server 2007

MCTS: Microsoft Office Communications Server 2007, Configuration

MCTS: Microsoft Office Groove 2007, Configuration

MCTS: Microsoft Office Live Communications Server 2005

MCTS: Microsoft Office PerformancePoint Server 2007, Applications

MCTS: Microsoft Office Projects 2007, Managing Projects

MCTS: Microsoft Office Project Server 2007, Configuration

MCTS: Microsoft Office SharePoint Server 2007 – Configuration

MCTS: Microsoft Office SharePoint Server 2007 - Application Development

MCTS: Microsoft Office Visio 2007, Application Development

MCTS: Windows SharePoint Services 3.0 - Application Development

MCTS: Windows SharePoint Services 3.0 – Configuration

Microsoft Exchange Server technology


MCTS: Microsoft Exchange Server 2007 - Configuration

Other technologies


MCTS: BizTalk Server 2006 R2, Custom Applications

MCTS: BizTalk Server 2006

MCTS: Designing and Providing Volume Licensing Solutions to Large Organizations

MCTS: Designing and Providing Volume Licensing Solutions to Small and Medium Organizations

MCTS: Microsoft Desktop Optimization Pack, Configuration

MCTS: Microsoft Forefront Client and Server – Configuration

MCTS: Microsoft Internet Security and Acceleration (ISA) Server 2006, Configuration

MCTS: Microsoft System Center Configuration Manager 2007, Configuration

MCTS: Microsoft System Center Operations Manager 2007, Configuration

MCTS: Microsoft System Center Virtual Machine Manager 2008, Configuration

MCTS: Microsoft Team Foundation Server: Configuration and Development

MCTS: Microsoft Virtual Earth 6.0, Application Development

*Multiple required exams for a certification may be taken in any order.

**Source @


Dec 8, 2009

Windows Server 2008 Active Directory, Configuring-Exam 70-640

Windows Server 2008 Active Directory, Configuring-Exam 70-640

About this ExamThis Technology Specialist (TS) exam, Exam 70-640: TS: Windows Server 2008 Active Directory, Configuring, became available in March 2008. This exam is available in English, Brazilian Portuguese, Chinese [Simplified], French, Japanese, Korean, Russian, and Spanish. More....

Windows Server 2008 Certification Road Map


Dec 7, 2009

Download Gmail mail in Microsoft outlook

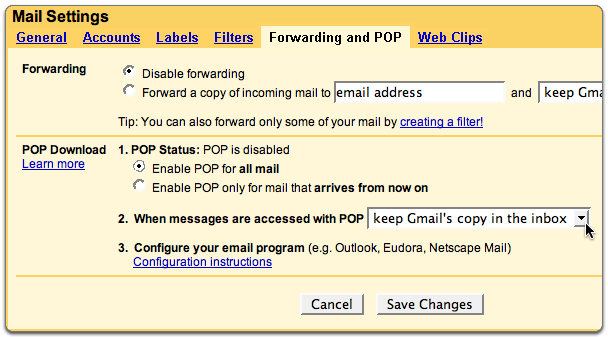
Enabling POP

Print

You can retrieve your Gmail messages with a client or device that supports POP, like Microsoft Outlook or Netscape Mail.

To enable POP in Gmail:

  1. Sign in to Gmail.
  2. Click Settings at the top of any Gmail page.
  3. Click Forwarding and POP/IMAP.

  4. Gmail POP Settings

  5. Select Enable POP for all mail or Enable POP for mail that arrives from now on.
  6. Choose the action you'd like your Gmail messages to take after they are accessed with POP.
  7. Configure your POP client* and click Save Changes.

Outlook Express

To set up your Outlook Express client to work with Gmail:

  1. Enable POP in your email account. Don't forget to click Save Changes when you're done.
  2. Open Outlook or Outlook Express.
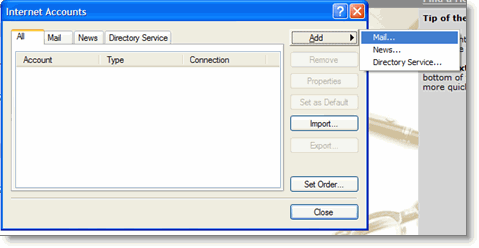
  3. Click the Tools menu, and select Accounts...
  4. Click Add, and then click Mail...
  5. Add mail account
  6. Enter your name in the Display name: field, and click Next.
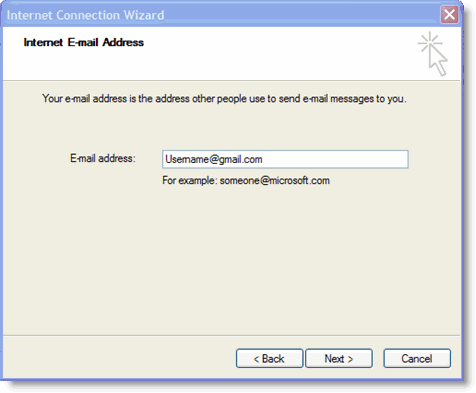
  7. Enter your full Gmail email address (username@gmail.com) in the Email address: field, and click Next. Google Apps users, enter your full address in the format 'username@your_domain.com.'
  8. Enter username
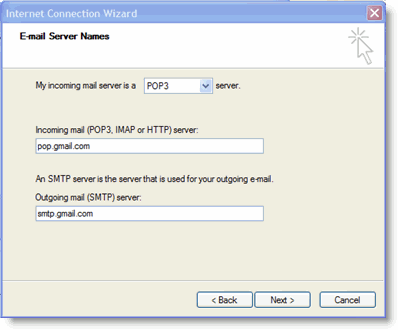
  9. Enter pop.gmail.com in the Incoming mail (POP3, IMAP or HTTP) server: field. Enter smtp.gmail.com in the Outgoing mail (SMTP) server: field. Google Apps users, enter the server names provided; don't add your domain name in this step.
  10. Enter server names
  11. Click Next.
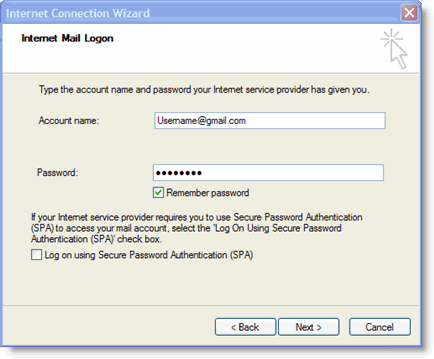
  12. Enter your full email address (including '@gmail.com' or '@your_domain.com') in the Account name: field. Enter your email password in the Password: field, and click Next.
  13. Enter account name and password
  14. Click Finish.
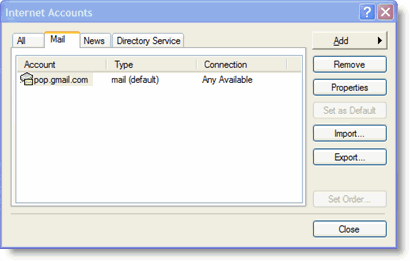
  15. Highlight pop.gmail.com under Account, and click Properties.
  16. Highlight account
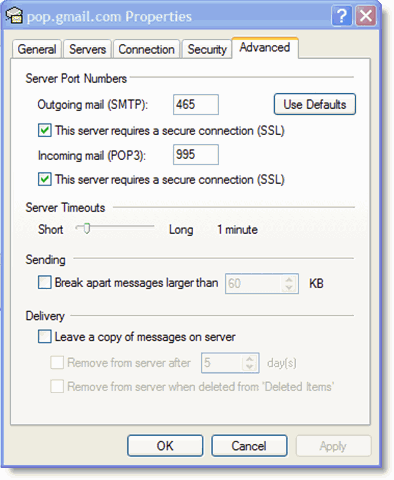
  17. Click the Advanced tab.
  18. Fill in the following information:*
    • Check the box next to This server requires a secure connection (SSL) under Outgoing Mail (SMTP).
    • Enter 465 in the Outgoing mail (SMTP): field.
    • Under Outgoing Mail (SMTP), check the box next to This server requires a secure connection (SSL).
    • Under Incoming mail (POP3), check the box next to This server requires a secure connection (SSL). The port will change to 995.
    • Highlight account

    *The order of Outgoing and Incoming mail server fields varies by version. Make sure you enter the correct information in each field.

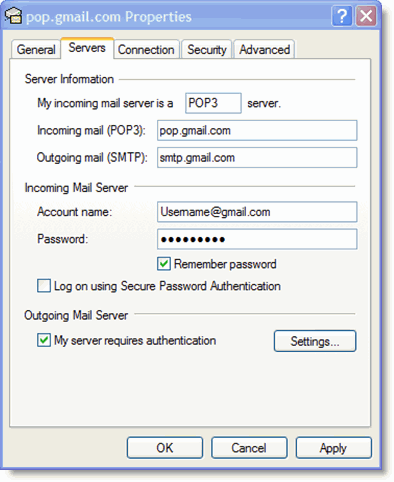
  19. Return to the Servers tab, and check the box next to My server requires authentication.
  20. Highlight account
  21. Click OK.

Congratulations! You're done configuring your client to send and retrieve Gmail messages.


Outlook 2003

To set up your Outlook client to work with Gmail:

  1. Enable POP in your email account. Don't forget to click Save Changes when you're done.
  2. Open Outlook.
  3. Click the Tools menu, and select E-mail Accounts...
  4. Click Add a new e-mail account, and click Next.
  5. Choose POP3 as your server type by clicking the radio button, and click Next.
  6. Fill in all necessary fields to include the following information:
    User Information
    Your Name: Enter your name as you would like it to appear in the From: field of outgoing messages.
    Email Address: Enter your full email address (username@gmail.com or username@your_domain.com)

    Server Information
    Google Apps users, enter the server names provided, don't add your domain name in this step.
    Incoming mail server (POP3): pop.gmail.com
    Outgoing mail server (SMTP): smtp.gmail.com

    Login Information
    User Name: Enter your Gmail username (including @gmail.com). Google Apps users, enter your full address in the format username@your_domain.com
    Password: Enter your email password


  7. Click More Settings... and then click the Outgoing Server tab.
  8. Check the box next to My outgoing server (SMTP) requires authentication and select Use same settings as my incoming mail server.


  9. Click the Advanced tab, and check the box next to This server requires an encrypted connection (SSL) under Incoming Server (POP3).


  10. Check the box next to This server requires an encrypted connection (SSL) under Outgoing Server (SMTP), and enter 465 in the Outgoing server (SMTP) box.
  11. Click OK.
  12. Click Test Account Settings... After receiving Congratulations! All tests completed successfully, click Close.
  13. Click Next, and then click Finish.
  14. Download the latest updates for Outlook from Microsoft. This will help prevent the most common Outlook errors Gmail users see.

Congratulations! You're done configuring your client to send and retrieve Gmail messages.


Outlook 2007

To configure Outlook 2007 for your Gmail address:
  1. Enable POP in your email account. Don't forget to click Save Changes when you're done.
  2. Open Outlook.
  3. Click the Tools menu, and select Account Settings...
  4. On the E-mail tab, click New...
  5. If you are prompted to Choose E-mail Service, select Microsoft Exchange, POP3, IMAP, or HTTP, and click Next.
  6. Fill in all necessary fields to include the following information:
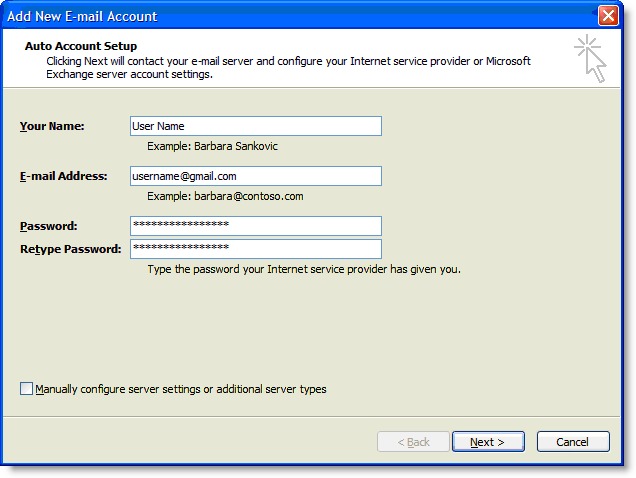
  7. Your Name: Enter your name as you would like it to appear in the From: field of outgoing messages.
    Email Address: Enter your full Gmail email address (username@gmail.com). Google Apps users, enter your full address in the format username@your_domain.com.
    Password: Enter your email password.

    Manually configure server settings or additional server types: Leave this option unchecked if you want to automatically configure Outlook 2007. If you want to manually configure Outlook 2007, check this box now. Google Apps users should configure manually as follows.

    Enter name, email address, and password

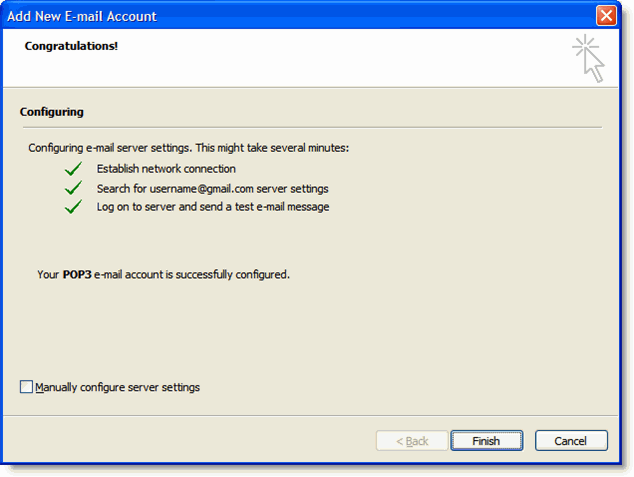
  8. Click Next. If you are configuring Outlook 2007 automatically, you're done! Just click Finish.
  9. Successful Configuration

  10. If you are configuring Outlook 2007 manually, select Internet E-mail and click Next.
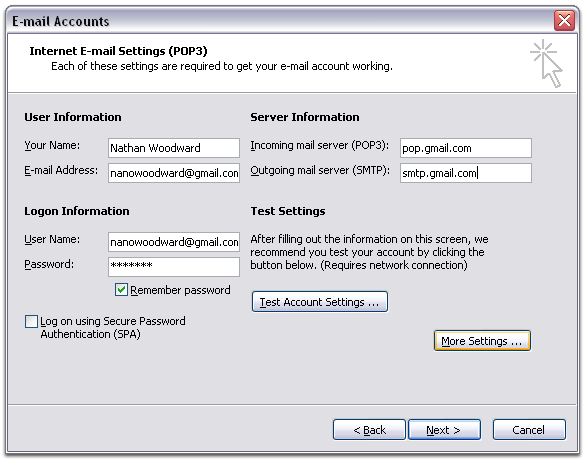
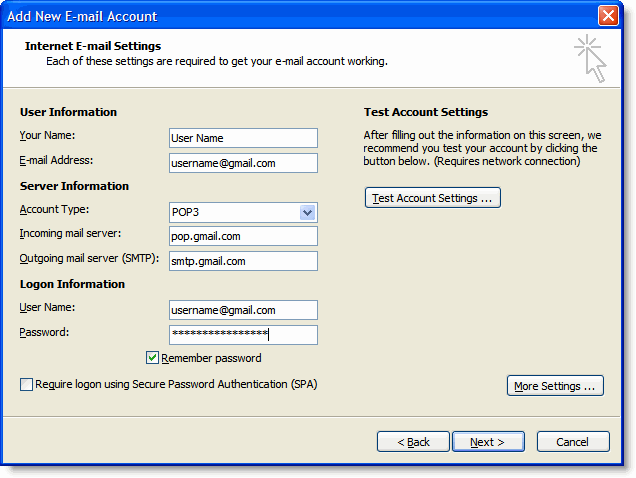
  11. Verify your User Information, and enter the following additional information:
  12. Server Information

    Account Type: POP3

    Incoming mail server: pop.gmail.com (Google Apps users, enter the server names provided, don't add your domain name in these steps)

    Outgoing mail server (SMTP): smtp.gmail.com

    Logon Information

    User Name: Enter your Gmail username (including @gmail.com). Google Apps users, enter your full address in the format username@your_domain.com

    Password: Enter your email password.

    Require logon using Secure Password Authentication (SPA): Leave this option unchecked.

    Account Settings
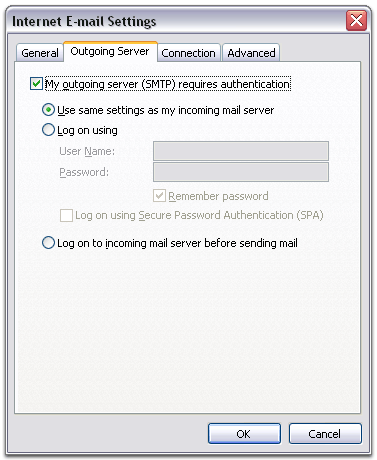
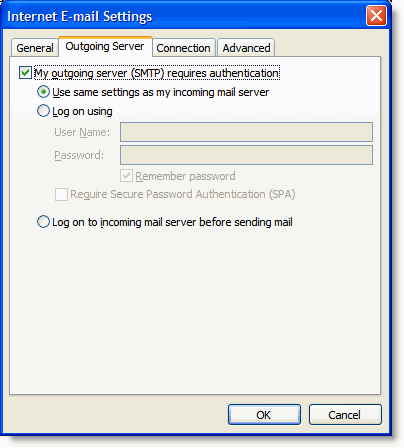
  13. Click the More Settings... button, and select the Outgoing Server tab.
  14. Check the box next to My outgoing server (SMTP) requires authentication and select Use same settings as my incoming mail server.
  15. Outgoing Server Tab

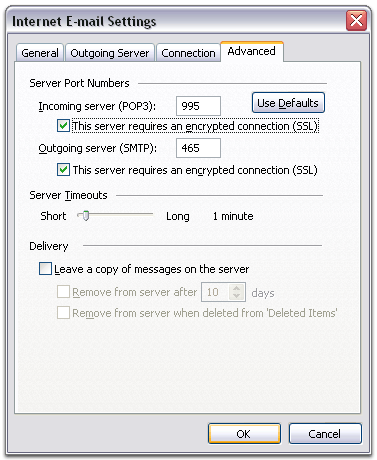
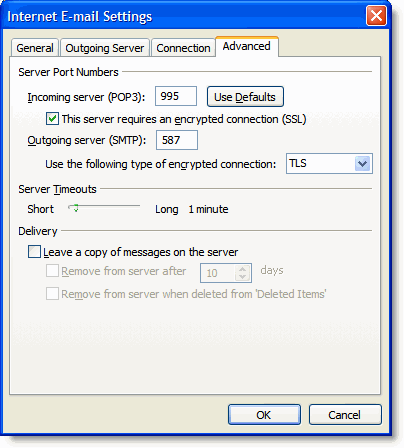
  16. Click the Advanced tab, and check the box next to This server requires an encrypted connection (SSL) under Incoming Server (POP3).
  17. In the Outgoing server (SMTP) box, enter 587, and select TLS from the drop-down menu next to Use the following type of encrypted connection:.
  18. Advanced Tab

  19. Click OK.
  20. Click Test Account Settings... After receiving 'Congratulations! All tests completed successfully', click Close.
  21. Click Next, and then click Finish.

Congratulations! You're done configuring your client to send and retrieve Gmail messages.

If you experience problems using POP with Outlook.


Team VIwer Full Cracked + Portable


Team VIwer Full Cracked + Portable

Click here DOWNLOAD1 & DOWNLOAD2

Network Password Recovery

When you connect to a network share on your LAN or to your .NET Passport account, Windows allows you to save your password in order to use it in each time that you connect the remote server. This utility recovers all network passwords stored on your system for the current logged-on user.

Which passwords this utility can recover ?

* Login passwords of remote computers on your LAN.
* Passwords of mail accounts on exchange server (stored by Outlook 2003)
* Password of MSN Messenger / Windows Messenger accounts
* Internet Explorer 7: passwords of password-protected Web sites ("Basic Authentication" or "Digest Access Authentication")
The item name of IE7 passwords always begin with "Microsoft_WinInet" prefix.

Click here DOWNLOAD

Password: www.mortal-team.com

Hidden Desktop 1.1.189


Hidden Desktop (H-Desk) at user's service. Protect your view.
How many times you are surfing the Internet and somebody unwanted (your boss, wife, children, curious work colleague?!?) suddenly captured your desktop view before you have enough time to close your applications with sensitive data. Not to mention that you maybe lost some important data because you forgot to save your work in rush to close those applications.

With Hidden Desktop you can hide all private applications and documents in a bit of second just pushing key on your computer's keyboard. And not just hide. They will magically disappear form taskbar and sys-tray as they have never been there.

Once when danger past and your view is clear you can restore your applications without any loss and continue to work. Like you’ve never been interrupted. Again just push hot-key on your keyboard. Moreover, you can even set password protection. If somebody knows about Hidden Desktop Software you can set up password by just entering it at the beginning of session and when you try to restore applications you will be asked to enter it again. If someone input wrong password nothing will happen and he/she will think there is nothing hidden. If you don't need this feature leave password field blank.

#Hidden Desktop supports all versions of Windows 9x/ME/NT/2000/XP operating systems with no exceptions.

Click here DOWNLOAD


Remote Administrator (RADMIN) 3.3.1


Features:
- Safe and fast computer control through Internet/Intranet network with TCP/IP protocol
- Computer administration and maintenance, e.g. on administrator or management workplaces
- User support and problem solution, e.g. helpdesk workplaces
- Observing teaching in computer classes
- File and folder transfer
- Activity recording when controlling a computer
- Activity monitoring or recording on a remote computer
- Starting commands and tools on a remote system
- Access to home computer from work through HTTP tunnel
- Access to work computer from home or another private network through HTTP tunnel

Supported Operating Systems:
- Windows? 95
- Windows? 98
- Windows? ME
- Windows NT? 4.0
- Windows? 2000
- Windows? XP (32/64-bit)
- Windows? Server 2003 (32/64-bit)
- Windows VistaTM (32/64-bit)

Click here DOWNLOAD


Dec 6, 2009

ISA server 2006 Configuration Step-By-Step Guide

Configure ISA 2006 Step By Step: DOWNLOAD

Installing ISA 2006 Enterprise Edition (beta) in a Unihomed Workgroup Configuration

Once you’ve performed those actions, you’ll be ready to install ISA Server 2006 Enterprise Edition on your unihomed computer.

Perform the following steps to install ISA Server 2006 Enterprise Edition:

  1. Copy the installation files for ISA Server 2006 Enterprise Edition to the unihomed ISA firewall device. Then double click on the isaautorun.exe to bring up the installation dialog box.
  2. In the Microsoft ISA Server 2006 beta installation dialog box, click the Install ISA Server 2006 link.
  3. Click Next on the Welcome to the Installation Wizard for Microsoft ISA Server 2006 Beta page.
  4. On the License Agreement page, select the I accept the terms in the license agreement option and click Next.
  5. On the Customer Information page, enter your User Name, Organization and Product Serial Number and click Next.
  6. On the Setup Scenarios page, select the Install both ISA Server services and Configuration Storage server option. Note that this option implies that you can install both ISA Server firewall services and the CSS at the same time, and then later install additional array members once you have this installed. This is not true. Use this option only if you plan to deploy a single member ISA Server 2006 Enterprise Edition array. If you plan to add additional array members later, then do not select this option. Since this article is focused on installing a single ISA Server 2006 Enterprise Edition unihomed device as a single member array, we will use this option. Click Next.


Figure 1

  1. On the Component Selection page, accept the default settings. Note that you don’t have the option to install the Firewall client. I’m not sure where or how we’ll end up doing this in the future, as its also not an option on the initial setup page. This will likely be worked out by the time the product releases. Note that Advanced Logging is MSDE logging. If you prefer to use SQL logging or text based logging, then do not select this option Click Next.


Figure 2

  1. On the Enterprise Installation Options page, select the Create a new ISA Server enterprise option. Since this will be the only machine in the array, we need to create a new ISA enterprise. Note that the option Create a replica of the enterprise configuration option is not available to workgroup configurations. This is something to keep in mind in the future if you want to have a backup CSS for your enterprise array. However, its not an issue for us, since this is a single machine array. Click Next.


Figure 3

  1. Click Next on the New Enterprise Warning page.


Figure 4

  1. On the Internal Network page, click the Add button.
  2. In the Addresses dialog box, click the Add Adapter button. In the Select Network Adapters dialog box, put a checkmark in the checkbox next to the single interface installed on the computer. Note that in a typical firewall installation, this NIC would be used to define the default Internal network. In a unihomed ISA firewall Web proxy configuration, this is not the case, since all addresses are considered internal. Click OK.


Figure 5

  1. In the Addresses dialog box, click OK. Note that the addresses listed in this dialog box will have no meaning in the unihomed ISA firewall configuration scheme. In a normal ISA firewall setup with multiple interfaces, these addresses would define the default Internal ISA firewall Network. However, as I mentioned in the last step, with a unihomed ISA firewall in Web proxy mode, all addresses are considered part of the default Internal ISA firewall Network.


Figure 6

  1. Click Next on the Internal Network page. Note again that the IP addresses listed here do not represent the default Internal Network on a unihomed ISA firewall as we'll see later when we apply the single NIC ISA firewall template.


Figure 7

  1. On the Firewall Client Connections page, click Next. We don’t have to worry about Firewall client connections because both Firewall and SecureNAT clients are not supported on a unihomed ISA firewall in Web proxy configuration. Only Web proxy clients are supported.
  2. Click Next on the Services Warning page.
  3. Click Install to being the installation.
  4. On the Installation Wizard Completed page, put a checkmark in the Invoke ISA Server Management when the wizard closes checkbox and click Finish.
  5. Close the Internet Explorer window entitled Protect the ISA Server Computer.

Post Installation Review

The first thing you’ll notice when the console opens is a link entitled Click here to learn about the Customer Experience Improvement Program. Click that link.


Figure 8

This brings up the Customer Feedback dialog box. I highly recommend that you participate in the Customer Experience Improvement Program. No personal data is sent to Microsoft and the result of your participation is to make the ISA firewall product more flexible and provide even higher levels of security to your network. Select the Yes option to participate in the program.


Figure 9

After you select an option and click OK, the link disappears from the middle pane of the console.

Expand all the nodes in the left pane of the ISA firewall console. Then perform the following steps to see the definition of the default Internal ISA firewall Network:

  1. In the left pane of the ISA firewall console, click the Networks node under the Configuration node.


Figure 10

  1. In the Networks node, click the Networks tab in the middle pane of the ISA firewall console. Double click on the Internal entry.
  2. In the Internal Properties dialog box, click the Addresses tab. Here you see the addresses that define the default Internal ISA firewall Network at this time. However, this will change when we configure this ISA firewall to act as a Web proxy only unihomed ISA firewall. Click Cancel to leave this dialog box.


Figure 11

What we need to do now is apply the unihomed ISA firewall template to configure this machine as a unihomed Web proxy only ISA firewall. Perform the following steps to apply the template:

  1. In the Task Pane, click the Templates tab. Scroll down the list of templates and click the Single Network Adapter template.


Figure 12

  1. Click Next on the Welcome to the Network Template Wizard page.
  2. Click Next on the Export the ISA Server Configuration page. Note that you have the option to export the current configuration, but we’ll not use that option because we haven’t made any configuration changes from the default setting.


Figure 13

  1. On the Internal Network IP Addresses page, you’ll see the addresses that will be configured to define the default ISA firewall Internal Network. Notice that all IP addresses except the local host network range are considered part of the default Internal network. For this reason, SecureNAT and Firewall clients are not supported in a unihomed Web proxy mode ISA firewall configuration. You do not need to make any changes on this page. Click Next.


Figure 14

  1. On the Select a Firewall Policy page, you are offered a single firewall policy to select from. Click on the Apply default Web proxying and caching configuration option. This will apply the default Deny rule to the firewall policy for the array. No Network Rules are created because the Web proxy always replaces its own IP address for the IP address of the Web proxy client connecting to the Internet through the unihomed Web proxy mode ISA firewall. Click Next.


Figure 15

  1. On the Completing the Network Template Wizard page, click Finish.
  2. Click Apply to save the changes and update the firewall policy.
  3. Click OK in the Apply New Configuration dialog box.

At this point you’re ready to start configuring firewall policy and customizing the installation.


Basics of Cisco Switch Administration – Set-2

How to save your switch configuration

In Part 1 of this series, we talked about how to enable/disable ports and how to change speed & duplex settings. Those are necessary administrator functions but, when you are done, you must save your configuration. Cisco switches will not automatically save your changes. If you make these changes and the switch looses power, those changes are gone. You must save your changes when you are done. The minimum that is required is to save your changes to the local switch NVRAM. There are two ways to do this, let me demonstrate:

The textbook method of savings your configuration is: Switch# copy running-config startup-config However, a legacy command that is short and sweet is: Switch# wr Both of these commands save your running configuration in RAM to the file NVRAM:startup-config. When the switch is powered off, the running-config is lost. The startup-config is read when the switch boots and the running-config is created. I also highly recommend that you save your configuration onto TFTP server, in case your switch’s local NVRAM is completely lost. Once you have a TFTP server running, you can easily save your configuration to it like this: Switch# copy running-config tftp

How to use the Cisco Network Assistant

The Cisco Network Assistant (CNA) is a free graphics tool included when you purchase a new switch. It is used to administer Cisco network devices. CNA is a feature-rich tool and I cannot possibly go into everything it can do in this short article. I recommend CNA to anyone who would like a graphical interface for their Cisco network devices. Basically, CNA gives you an overview screen of your Cisco devices, like this: Once you click on Configure then Port Settings, you will see something like this: From here, you can configure the state, duplex, speed, and other options for your switch ports. In fact, you can configure most switch features with the CNA. Keep in mind that for all Cisco switches, there is also the web-based interface. It may be more limited than what CNA offers. This interface can be accessed directly with your web browser, or it can be launched via CNA. Here is a sample screenshot of my Cisco 3550 web-based interface:

How to speed up switch port startup

Switch ports could be connected to a variety of devices – other switches, routers, trunk ports, PC’s, or VoIP phones. Each of these devices has a different configuration. Sometimes, when a device is connected to a switch port, the switch will attempt to negotiate settings to match this device. This takes time and it will delay the ability of your device (such as a PC) to transmit and receive data from the network. Most of the time, you are connecting a PC to a switch and you just want to be able to use the network as soon as possible, right? The command I recommend enabling on all PC/laptop/printer switch ports is this: The switchport mode access command will configure this port not to go through the spanning-tree process and will get your PC access to the network faster.

Basic VLAN commands

Most companies today use Virtual LANs (VLANs). As an administrator, you should know how to 1) see what device is on what VLAN and 2) to change the VLAN that a device is in. As you know, if your device is in the wrong VLAN, it won’t be able to communicate with the servers that it needs to talk to and/or it may be on the wrong IP subnet. To see what VLAN a device is in, my favorite command is show vlan brief. Here is an example:

As you can see, this command shows you what VLANs exist on this switch, and what switch ports are in what VLAN. Now, say that you want to change interface/port Fa0/21 from VLAN 1 (the default) to vlan 131. Let me show you how to do that: That’s right, you simply go into interface configuration mode on the interface you want to change the VLAN, and use the switchport access vlan XXX command. Once you are done, to verify the vlan membership, just run the show vlan brief command again, like this: You can see from the command output that Fa0/21 is now a member of VLAN 131.

Article Summary

Here is what we have learned:

  • How to save your switch's configuration
  • How to use the Cisco Network Assistant
  • How to speed up your switch port startup
  • Basic VLAN commands

For more information on switch configuration, see the Cisco Cataylst 2950 switch administration guide.

Basics of Cisco Switch Administration – Set-One

Perhaps you are asked to configure a switch port or see what MAC address is on what port. Maybe this isn’t something you do every day and need a refresher course on the most basic Cisco switch administration tasks. Let’s find out how to perform some basic Cisco switch administration tasks.

Log in

Before you can administer the switch you are going to need some basic information:

  • What is the switches IP address or DNS name?
  • What is the username/password you can use to login?
  • What Ethernet switch port is the device in question connected to?

One option to configure the switch might be a web-based administration interface. If this is the case, basic configurations aren’t going to be that difficult and perhaps you don’t need much more help. On the other hand, GUI interfaces aren’t always available, but on Cisco IOS switches, the Cisco IOS always is. Plus, in a GUI interface, you won’t be able to do every possible configuration. In the command-line interface you will be able to perform every possible configuration. For that reason, I encourage you to use the IOS command-line interface. I will be performing these common switch administration tasks on the Cisco IOS command-line interface.

Showing the switch configuration

Just like on a router, the most command-switch IOS command is to show the switch’s configuration. This will show you the configuration for the entire switch, including all the Ethernet ports on the switch. To see switch configuration, just type show running-config, like this:

Showing interface port status

Most of the time you are going to a switch, you want to troubleshoot a switch port, or change a switch port configuration. The quickest way to see the status of your switch ports is to use the show interfaces status, like this: This command shows each port: if the port is connected to the device, the VLAN the port is in, the port duplex, the port speed, and port type. This is an excellent quick way to see status for your switch ports.

Changing interface speed & duplex

Say that you see that interface Fa0/21 is set to auto (auto negotiate) for its speed but it needs to be set to 10Mb/sec. To change the speed of any port, you go to interface configuration mode and use the speed command, like this:

On this switch, the possible speeds for the 10/100 Ethernet ports are auto, 10, and 100. On the Gigabit Ethernet ports, you can only tell the switch to either negotiate port speed or not to negotiate port speed. Once the speed is configured to 10Mb, you can verify it with the show interfaces fa0/21 status, like this: As you can see, the speed is now set to 10. To change the duplex of a port, you perform the same steps but use the duplex command. Duplex can be set to auto, full, or half.

Enabling and disabling interfaces

To enable and disable interfaces, you use the no shutdown and the shutdown command in interface configuration mode. Here is an example:

Notice how when the port was shutdown, console messages appear that told you the administrative state had changed to down, and the line protocol changed to down. When the port was enabled (no shutdown), the link went down, then the line when up, then the line protocol changed to up.

You could now do a show interfaces status to see the state of the interface.

Article Summary

Here is what we have learned:

  • How to show a switch’s configuration
  • How to show the status of switch interfaces
  • Change the speed and duplex of a switch port
  • How to disable (shutdown) and enable (no shutdown) ports on a Cisco IOS switch