To begin the Exchange Server 2007 installation process, I downloaded the current Exchange Server 2007 beta from the Microsoft Web site. I then double-clicked on the file that I downloaded to extract the Exchange Server 2007 setup files.
To install Exchange Server 2007, double-click on the Setup.exe file to see the splash screen shown in Figure 1.
Figure 1: This is the Exchange Server 2007 installation screen.
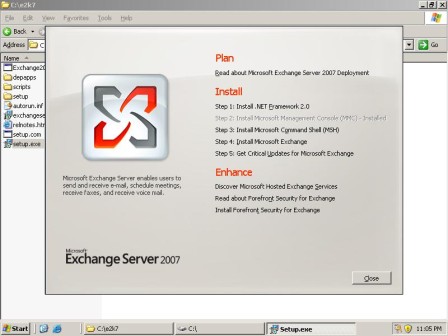
As you can see, there are five steps to installing Exchange Server 2007: installing the .NET Framework, installing the Microsoft Management Console, installing the Microsoft Command Shell, installing Exchange Server, and downloading any available updates.
Step 1: Install the .NET Framework 2.0
The first step in the Exchange Server 2007 installation process is to install version 2.0 of the .NET Framework. The installer makes it look like the .NET Framework will be installed as a part of the Setup process. However, when you click on the Install .NET Framework 2.0 link, you are taken to a Web page where you can download the .NET Framework 2.0.
The .NET Framework is only 45.2 MB in size, so the download shouldn't be a big deal. One thing that you do have to pay attention to though is the fact that there are 32-bit and 64-bit versions. Make sure you download the 64-bit version of the .NET Framework 2.0.
Step 2: Install the Microsoft Management Console
Exchange Server 2007 requires version 3.0 of the Microsoft Management Console (MMC). The new management console differs from the previous version in that it supports three horizontal panes, as opposed to the two panes that the previous version was limited to. MMC 3.0 also supports an extra vertical pane. These extra panes don't show up if you simply enter the MMC command at the Run prompt, but the new Exchange System Manager -- now called the Exchange Management Console -- makes use of them.
In Figure 1 above, the option to install Microsoft Management Console was grayed out on my test machine. This is because MMC 3.0 was installed by default with Windows Server 2003 R2 SP1.
Step 3: Install Microsoft Command Shell
As tidbits of information about Exchange Server 2007 and Windows Server Longhorn have leaked out, you might have heard about Monad. Not too long ago, Microsoft renamed Monad to Microsoft Command Shell; it is a scripting language that will be native to Longhorn Server.
Exchange Server 2007 is written in such a way that anything that can be done through the Exchange Management Console can also be scripted through the Microsoft Command Shell. In fact, I have heard rumors that the new Exchange System Manager was written on top of the Microsoft Command Shell.
At any rate, the Microsoft Command Shell is a required component. Like the .NET Framework, you will be prompted to download the Microsoft Command Shell as part of the Exchange Server 2007 installation process.
Step 4: Install Microsoft Exchange
Now it's time to install Exchange Server 2007 itself:
- Click on the "Install Microsoft Exchange" link to view the screen shown in Figure 2.
Figure 2: This is the initial Exchange Server 2007 Setup screen.
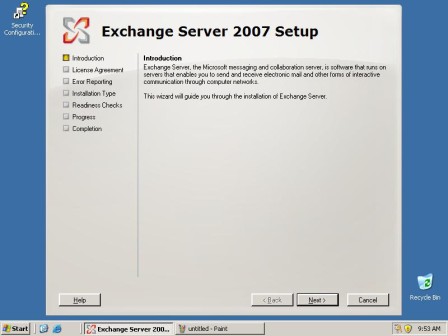
- Click Next to bypass the wizard's Welcome screen and view the End User License Agreement. Accept the license agreement and click Next.
- You will now see a screen asking if you would like to enable error reporting. If you enable error reporting, information about errors that occur will be silently transmitted to Microsoft over an encrypted connection. Whether or not you enable error reporting is up to you, but for beta testing purposes, I highly recommend enabling it.
- Click Next and you will see the screen shown in Figure 3. This screen asks you if you want to perform a typical or custom Exchange Server installation. While asking about custom installations isn't new to Microsoft products, the way that Exchange Server 2007 goes about the process is new.
Figure 3: Choose a typical or custom installation.
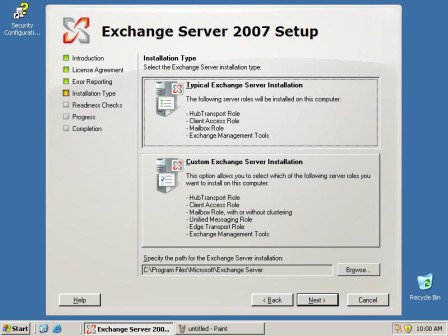
- Notice that there are a number of Exchange Server 2007 server roles listed below each installation type. Server roles are a big new concept in Exchange Server 2007. The roles that you select control the server's capabilities and what services and dependencies are installed. I will be talking a lot more about roles in future articles. For now though, select the "Typical" Exchange Server Installation option and then click Next.
- Enter a name for the Exchange Server organization and click Next. The default organization name is "First Organization," which is what I will be using for the purposes of this tutorial. In Exchange Server 2003, choosing an organization name was a big deal because it could not be changed later on. I'm honestly not sure if this has changed in Exchange 2007 or not, but choose your name carefully just in case.
- Click Next and Setup will ask you if you have any client computers running Outlook 2003 or earlier versions of Microsoft Outlook. When answering this question, think about not only if there are Outlook 2003 clients now, but whether there will ever be any Outlook 2003 clients. Since I am using Outlook 2007 on a test network, I answered "No" to this question.
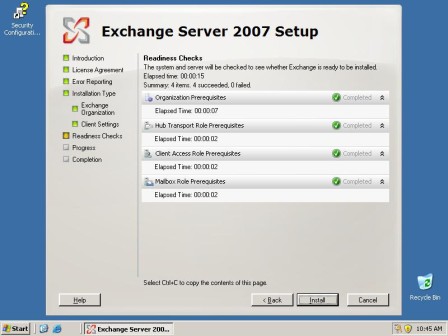
- Click Next again and Setup will run a readiness check against the server and the forest as a whole. The readiness check itself doesn't take long, but be prepared to spend a little time cleaning up the issues that the readiness check reveals. On my test deployment, there were a couple of Windows patches that Setup required me to download and install before it could continue. When the readiness checks complete, the results look something like what you can see in Figure 4.
Figure 4: This is the Readiness Check screen.
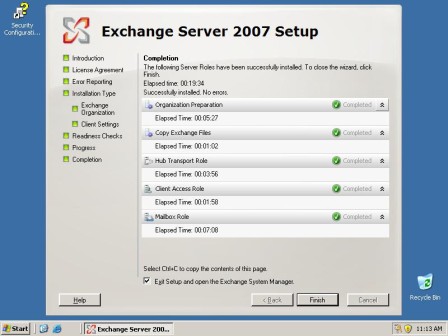
- Now click the Install button and Exchange 2007 Setup will begin installing the necessary files and configuring the selected roles. As you can see in Figure 5, the installation process took about 20 minutes to complete on my test server.
Figure 5: The installation process tool about 20 minutes to complete.
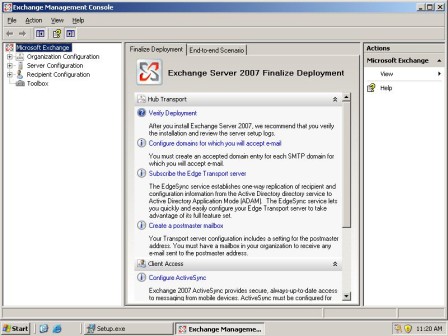
- When the installation process completes, the Exchange Management Console (formerly known as Exchange System Manager) will open and you will be prompted to begin the final configuration process, which I outline in the next segment of this tutorial.
Figure 6: This is what the new Exchange System Manager looks like.
No comments:
Post a Comment